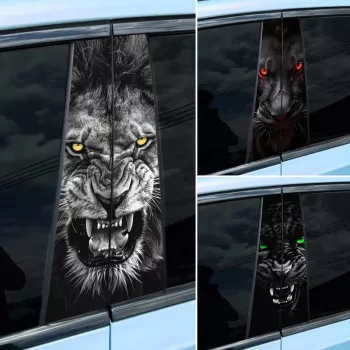
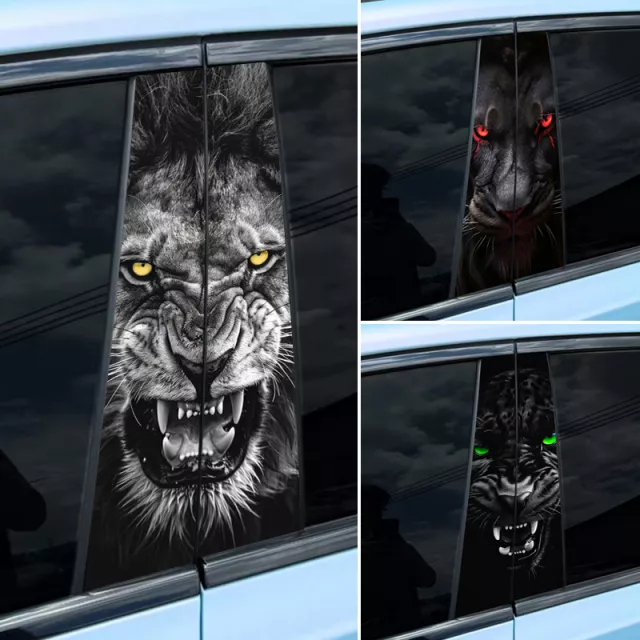
Add a bold, aggressive accent to the side profile of a car with ferocious animal B-pillar stickers. Designed for quick upgrades without permanent changes, these decals bring a sharp “eyes-on-you” look while helping unify tinted glass and dark trim for a cleaner, sportier silhouette.
What B-pillar stickers change visually
The B-pillar is the vertical strip between the front and rear side windows. It’s a small area, but it sits at eye level and strongly affects how “connected” your windows and trim look from the curb.
- Creates a strong vertical accent between the front and rear windows, making the side profile look more cohesive.
- Adds a “predator/ferocious animal” graphic element that stands out without requiring body modifications.
- Pairs well with window tint, black mirror caps, rain guards, and dark wheel finishes for a consistent theme.
- A removable style upgrade that can be refreshed or swapped when tastes change.
Fitment and placement on common vehicles
These stickers are intended for the B-pillar area on many Ford, Toyota, and Honda vehicles. Because pillar trims vary by generation and trim level, a quick measurement check is the easiest way to avoid frustration during install.
- Intended for the B-pillar area (the vertical trim between front and rear side windows) on many Ford, Toyota, and Honda models.
- Best results come from measuring the pillar trim height/width and comparing to the decal dimensions before installation.
- Works on glossy pillar trim and can also be applied on painted surfaces if the paint is fully cured and smooth.
- Avoid placing over sharp curves, heavy texture, or damaged clear coat; those areas reduce adhesion and can cause edge lift.
Quick fit check before applying
| Check |
What to look for |
Why it matters |
| Surface type |
Smooth glossy trim or smooth paint |
Better bond and fewer bubbles |
| Measurements |
Width/height of the pillar area |
Prevents misalignment and overhang |
| Existing coatings |
Wax, ceramic coating, dressings |
These can reduce adhesion if not stripped/cleaned |
| Temperature |
Moderate, stable ambient temperature |
Helps adhesive set evenly |
Material and durability expectations
B-pillar decals typically use a pressure-sensitive adhesive designed for exterior automotive use. Longevity depends less on “brand magic” and more on the basics: prep quality, surface condition, and how the edges are treated after installation.
- Decals typically use pressure-sensitive adhesive; durability depends on prep, placement, and exposure.
- A properly applied sticker should handle regular driving conditions, rain, and gentle washing.
- Frequent high-pressure spraying directly at the edges can shorten lifespan; keep the nozzle angle shallow and at a safe distance.
- If the car is parked outdoors full-time, occasional inspection of edges helps catch early lifting before it spreads.
For general vinyl handling and graphics guidance, it’s worth reviewing manufacturer recommendations such as 3M’s graphics and vinyl resources.
Installation steps for a clean, bubble-free look
A ferocious graphic looks best when it appears “factory-straight.” Taking an extra few minutes to align both sides evenly usually matters more than applying fast.
- Wash the area and fully dry it; then wipe with isopropyl alcohol (IPA) to remove oils and residue.
- Test-fit by holding the decal up to the pillar and marking alignment points with low-tack tape.
- Peel gradually and apply from top to bottom, using a squeegee or soft card wrapped in microfiber to push air outward.
- For minor bubbles, gently lift and re-lay the section; for tiny trapped air, allow time—some micro-bubbles dissipate as adhesive cures.
- After applying, avoid washing for at least 24–48 hours so the adhesive can set.
If the pillar is narrow, use the window trim edges as visual reference points. If the pillar is wider, center the graphic consistently on both sides so the “eyes” sit at the same height left-to-right.
Care, washing, and removal
Most premature failures happen at the edges. Keep edges clean, avoid aggressive spraying directly into seams, and treat the decal like a trim piece rather than a panel you blast with pressure.
For broader wash best practices, the International Carwash Association offers practical care guidance that applies well to vehicles with exterior accessories and decals.
Style ideas that match the ferocious theme
Product options
- Ferocious Animal Car B-Pillar Stickers – Fits Ford, Toyota, Honda Vehicles: a simple, low-cost exterior detail upgrade for a sharper side profile.
- Sturdy 6×4 FT Metal Outdoor Storage Shed for Garden, Bike, and Tools: handy for keeping car-care supplies, wash buckets, and seasonal accessories organized and out of the weather.
- Vintage Embossed Glass Storage Jar with Airtight Seal – 23.7 oz: a neat way to store small garage items like clips, extra trim tape, microfiber tabs, or detailing swabs.
FAQ
Will these B-pillar stickers fit my specific Ford, Toyota, or Honda model?
Fit depends on the exact dimensions and shape of your B-pillar trim. Measure the usable height and width on your vehicle and compare it to the decal size and coverage shown in the listing images before applying.
Can B-pillar stickers be applied over ceramic coating or wax?
It’s best to remove wax, sealant, or ceramic residue from the application area first so the adhesive can bond properly. If coatings remain on the surface, edge lift and early failure are more likely.
How do I remove the stickers without damaging paint?
Use gentle heat, peel slowly at a low angle, and remove any leftover adhesive with a paint-safe adhesive remover. Once the surface is clean, wash the area and reapply protection if desired.
Recommended for you

Leave a comment