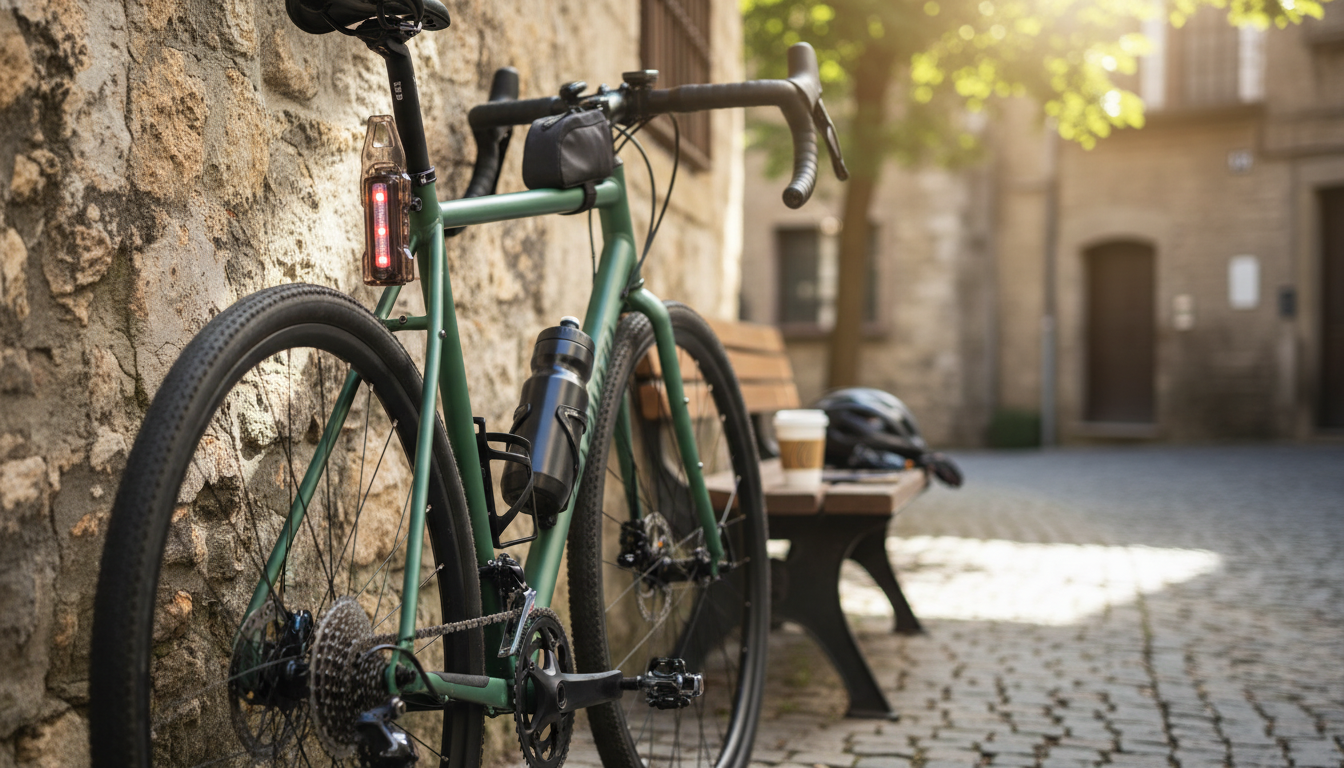
A bottle cage is easy to overlook until a ride turns bumpy, the light fades, or hydration becomes a hassle. A lightweight, compact holder that adds a secure spot for your bottle plus integrated taillights can make everyday riding feel simpler—especially when you’re rolling at dusk, commuting after work, or stretching a weekend route a little longer.
If your bike setup tends to drift into “just one more thing on the bars,” combining bottle access and rear visibility in one place helps keep your cockpit clean while putting a key safety item where it’s easier to remember.
This style of accessory combines two ride essentials—bottle storage and rear visibility—into a single compact unit. Instead of juggling a cage plus a separate rear-light mount, you get hydration within reach and a dedicated taillight position on the frame.
If you’re shopping for a streamlined option, Bike Water Bottle Holder with Safety Taillights – Lightweight & Compact is an easy add-on for many commuter and fitness bikes.
Small design choices make the difference between a cage that feels “set and forget” and one that constantly needs attention. A good compact cage should balance grip, easy access, and a taillight position that stays visible.
For riders who often carry the bike up steps, onto transit, or into an apartment, the “compact” part matters: fewer protrusions means fewer bumps and fewer accidental snags.
Rear lights help you stand out, but only if they’re bright enough, aimed correctly, and mounted steadily. A light that wobbles or gets blocked by clothing can be less useful than expected.
For broader bike safety guidance, the NHTSA bicycle safety page is a solid reference, and the CPSC bicycle helmet safety resource is helpful for dialing in the rest of your kit.
Most bottle cages share standard mounting conventions, but frame geometry, bottle shape, and add-ons (like saddle bags) can affect how well a cage-plus-light setup works on your bike.
| Item to check | Why it matters | What to do |
|---|---|---|
| Bottle-cage bosses on frame | Required for standard mounting | Look for two threaded holes on down tube/seat tube |
| Bottle diameter and height | Affects grip and removal | Compare your usual bottle to the cage opening |
| Rear visibility line | Prevents the light being blocked | Test with saddle bag/jacket; adjust placement if possible |
| Terrain and vibration | Rough rides can eject bottles | Use a tighter cage fit and re-check fasteners periodically |
One more real-world check: if you ride a very small frame or a full-suspension frame, confirm the bottle won’t contact a rear shock or linkage through the suspension travel. Clearance issues are uncommon on many commuter frames, but they’re worth verifying before tightening everything down.
A few minutes of careful setup makes the accessory feel solid and keeps the light pointed where it’s most effective.
If you’re also looking for an at-home place to keep your bike protected and organized between rides, consider the Sturdy 6×4 FT Metal Outdoor Storage Shed for Garden, Bike, and Tools as a longer-term storage option.
Most standard cycling water bottles fit typical cages, but oversized insulated bottles can be tighter in compact designs. Check your bottle’s diameter and height, and confirm your frame has enough clearance to insert and remove the bottle easily.
Blinking modes can grab attention in busy traffic, while steady mode can make it easier for others to judge distance and closing speed. Use the mode that matches your riding conditions and follow any local rules about light patterns.
Aim it straight back and roughly level with the road so it’s visible from behind at typical driver eye height. Make sure it isn’t blocked by a saddle bag, jacket, or jersey, and do a quick check from behind the bike before rolling out.


Leave a comment